
Page 134 - Clinical Managers Orientation Binder
P. 134
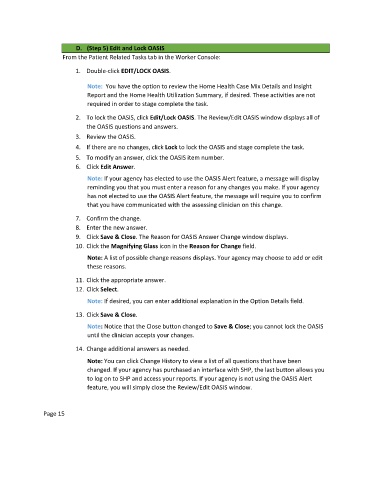
D.  (Step 5) Edit and Lock OASIS
                         From the Patient Related Tasks tab in the Worker Console:

                          1.  Double-click EDIT/LOCK OASIS.

                              Note:  You have the option to review the Home Health Case Mix Details and Insight
                              Report and the Home Health Utilization Summary, if desired. These activities are not
                              required in order to stage complete the task.

                          2.  To lock the OASIS, click Edit/Lock OASIS. The Review/Edit OASIS window displays all of
                              the OASIS questions and answers.
                          3.  Review the OASIS.
                          4.  If there are no changes, click Lock to lock the OASIS and stage complete the task.
                          5.  To modify an answer, click the OASIS item number.
                          6.  Click Edit Answer.
                              Note: If your agency has elected to use the OASIS Alert feature, a message will display
                              reminding you that you must enter a reason for any changes you make. If your agency
                              has not elected to use the OASIS Alert feature, the message will require you to confirm
                              that you have communicated with the assessing clinician on this change.
                          7.  Confirm the change.
                          8.  Enter the new answer.
                          9.  Click Save & Close. The Reason for OASIS Answer Change window displays.
                          10. Click the Magnifying Glass icon in the Reason for Change field.
                              Note: A list of possible change reasons displays. Your agency may choose to add or edit
                              these reasons.

                          11. Click the appropriate answer.
                          12. Click Select.

                              Note: If desired, you can enter additional explanation in the Option Details field.
                          13. Click Save & Close.

                              Note: Notice that the Close button changed to Save & Close; you cannot lock the OASIS
                              until the clinician accepts your changes.

                          14. Change additional answers as needed.

                              Note: You can click Change History to view a list of all questions that have been
                              changed. If your agency has purchased an interface with SHP, the last button allows you
                              to log on to SHP and access your reports. If your agency is not using the OASIS Alert
                              feature, you will simply close the Review/Edit OASIS window.


               Page 15