
Page 32 - H2AIR® Arch
P. 32
®
H2AIR ARCH
Utilities
Electrical Connection: H2Air® Air Panel to Controller
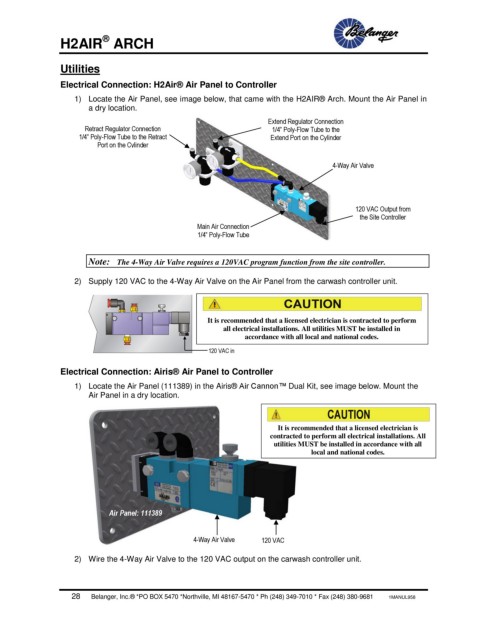
1) Locate the Air Panel, see image below, that came with the H2AIR® Arch. Mount the Air Panel in
a dry location.
Extend Regulator Connection
Retract Regulator Connection 1/4” Poly-Flow Tube to the
1/4” Poly-Flow Tube to the Retract Extend Port on the Cylinder
Port on the Cylinder
4-Way Air Valve
120 VAC Output from
the Site Controller
Main Air Connection
1/4” Poly-Flow Tube
Note: The 4-Way Air Valve requires a 120VAC program function from the site controller.
2) Supply 120 VAC to the 4-Way Air Valve on the Air Panel from the carwash controller unit.
It is recommended that a licensed electrician is contracted to perform
all electrical installations. All utilities MUST be installed in
accordance with all local and national codes.
120 VAC in
Electrical Connection: Airis® Air Panel to Controller
1) Locate the Air Panel (111389) in the Airis® Air Cannon™ Dual Kit, see image below. Mount the
Air Panel in a dry location.
It is recommended that a licensed electrician is
contracted to perform all electrical installations. All
utilities MUST be installed in accordance with all
local and national codes.
Air Panel: 111389
4-Way Air Valve 120 VAC
2) Wire the 4-Way Air Valve to the 120 VAC output on the carwash controller unit.
28 Belanger, Inc.® *PO BOX 5470 *Northville, MI 48167-5470 * Ph (248) 349-7010 * Fax (248) 380-9681 1MANUL958