
Page 33 - H2AIR® Arch
P. 33
®
H2AIR ARCH
Utilities
Electrical Connections: Overview for LEDs
The H2AIR® Arch has RGB LED-illuminated DryLite™ Air Cannon™ Dryer Nozzles, Top Manifold
Assemblies and Leg Manifold Assemblies. The LED lights for the DryLite™ Dryer Nozzles and the Top
Manifolds were prewired, at Belanger®, within the Electrical Box on the passenger side of the Top Flip
Weldment. Then during installation of the H2AIR® Arch the wires for the LED lights in the Leg Assemblies
were routed to the Electrical Box on the driver side of the Top Flip Weldment. At this time all of the LED
cables are ready to be wired to the Main Power.
Electrical Connections: Main Power for DryLite™ Dryers & Top Manifold LEDs
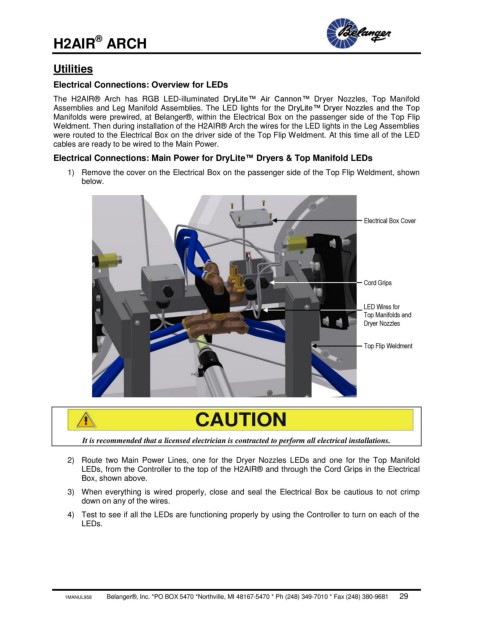
1) Remove the cover on the Electrical Box on the passenger side of the Top Flip Weldment, shown
below.
Electrical Box Cover
Cord Grips
LED Wires for
Top Manifolds and
Dryer Nozzles
Top Flip Weldment
CAUTION
It is recommended that a licensed electrician is contracted to perform all electrical installations.
2) Route two Main Power Lines, one for the Dryer Nozzles LEDs and one for the Top Manifold
LEDs, from the Controller to the top of the H2AIR® and through the Cord Grips in the Electrical
Box, shown above.
3) When everything is wired properly, close and seal the Electrical Box be cautious to not crimp
down on any of the wires.
4) Test to see if all the LEDs are functioning properly by using the Controller to turn on each of the
LEDs.
1MANUL958 Belanger®, Inc. *PO BOX 5470 *Northville, MI 48167-5470 * Ph (248) 349-7010 * Fax (248) 380-9681 29