
Page 37 - Computer Basics - Research
P. 37
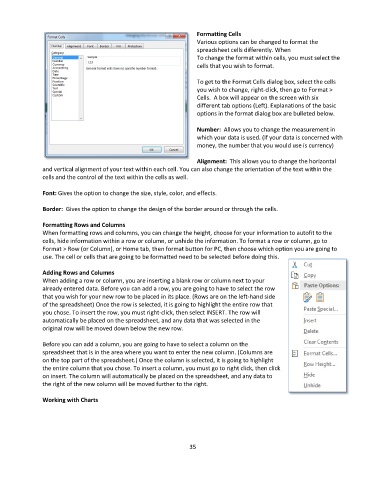
Formatting Cells
                                                                    Various options can be changed to format the
                                                                    spreadsheet cells differently. When
                                                                    To change the format within cells, you must select the
                                                                    cells that you wish to format.

                                                                    To get to the Format Cells dialog box, select the cells
                                                                    you wish to change, right-click, then go to Format >
                                                                    Cells.  A box will appear on the screen with six
                                                                    different tab options (Left). Explanations of the basic
                                                                    options in the format dialog box are bulleted below.

                                                                    Number:  Allows you to change the measurement in
                                                                    which your data is used. (If your data is concerned with
                                                                    money, the number that you would use is currency)

                                                                    Alignment:  This allows you to change the horizontal
               and vertical alignment of your text within each cell. You can also change the orientation of the text within the
               cells and the control of the text within the cells as well.

               Font: Gives the option to change the size, style, color, and effects.

               Border:  Gives the option to change the design of the border around or through the cells.

               Formatting Rows and Columns
               When formatting rows and columns, you can change the height, choose for your information to autofit to the
               cells, hide information within a row or column, or unhide the information. To format a row or column, go to
               Format > Row (or Column), or Home tab, then format button for PC, then choose which option you are going to
               use. The cell or cells that are going to be formatted need to be selected before doing this.

               Adding Rows and Columns
               When adding a row or column, you are inserting a blank row or column next to your
               already entered data. Before you can add a row, you are going to have to select the row
               that you wish for your new row to be placed in its place. (Rows are on the left-hand side
               of the spreadsheet) Once the row is selected, it is going to highlight the entire row that
               you chose. To insert the row, you must right-click, then select INSERT. The row will
               automatically be placed on the spreadsheet, and any data that was selected in the
               original row will be moved down below the new row.

               Before you can add a column, you are going to have to select a column on the
               spreadsheet that is in the area where you want to enter the new column. (Columns are
               on the top part of the spreadsheet.) Once the column is selected, it is going to highlight
               the entire column that you chose. To insert a column, you must go to right click, then click
               on insert. The column will automatically be placed on the spreadsheet, and any data to
               the right of the new column will be moved further to the right.

               Working with Charts


                                                                 35