Page 609 - Foton Workshop Manual - Auman EST-M
P. 609

Engine section – Engine (Cummins ISF3.8)                   EG - 93

                                                                                                                  IN

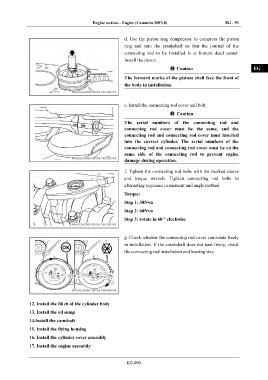
                                                        d.  Use  the  piston  ring  compressor  to  compress  the  piston

                                                        ring  and  turn  the  crankshaft  so  that  the  journal  of  the
                                                                                                                  DI
                                                        connecting  rod  to  be  installed  is  at  bottom  dead  center.
                                                        Install the piston.
                                                                                 Caution                          EG

                                                        The forward marks of the pistons shall face the front of
                                                        the body in installation.                                 TR


                                                                                                                  AX
                                                        e. Install the connecting rod cover and bolt.

                                                                                Caution
                                                                                                                  FR
                                                        The  serial  numbers  of  the  connecting  rod  and
                                                        connecting  rod  cover  must  be  the  same,  and  the
                                                        connecting rod and connecting rod cover must inserted     ST
                                                        into  the  correct  cylinder.  The  serial  numbers  of  the
                                                        connecting rod and connecting rod cover must be on the
                                                        same  side  of  the  connecting  rod  to  prevent  engine   BR
                                                        damage during operation.
                                                                                                                  BW
                                                        f. Tighten the connecting rod bolts with the marked sleeve

                                                        and  torque  wrench.  Tighten  connecting  rod  bolts  in
                                                        alternating sequence in moment and angle method.          EL
                                                        Torque:
                                                        Step 1: 30N•m
                                                        Step 2: 60N•m

                                                        Step 3: rotate in 60 ° clockwise


                                                        g. Check whether the connecting rod cover can rotate freely
                                                        in installation. If the crankshaft does not turn freely, check
                                                        the connecting rod installation and bearing size.


              12. Install the flitch of the cylinder body

              13. Install the oil sump
              14.Install the camshaft
              15. Install the flying housing
              16. Install the cylinder cover assembly

              17. Install the engine assembly


                                                         EG-093
   604   605   606   607   608   609   610   611   612   613   614