
Page 22 - Airstream™ Series Dryer
P. 22
AIRSTREAM™ SERIES DRYER
Installation
Airstream™ / Pro Airstream™ Frame With Top Nozzle
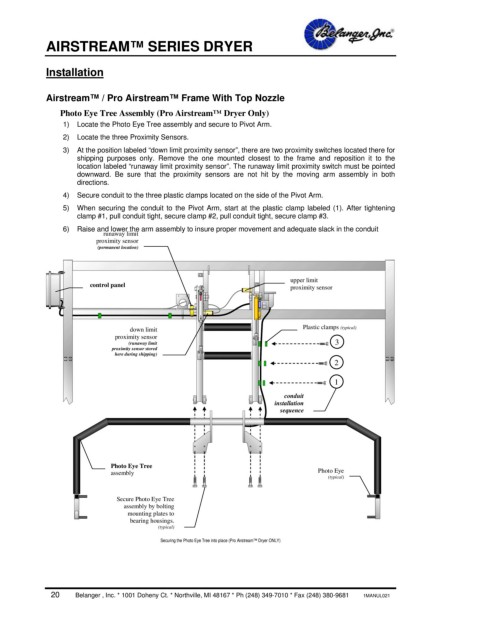
Photo Eye Tree Assembly (Pro Airstream™ Dryer Only)
1) Locate the Photo Eye Tree assembly and secure to Pivot Arm.
2) Locate the three Proximity Sensors.
3) At the position labeled “down limit proximity sensor”, there are two proximity switches located there for
shipping purposes only. Remove the one mounted closest to the frame and reposition it to the
location labeled “runaway limit proximity sensor”. The runaway limit proximity switch must be pointed
downward. Be sure that the proximity sensors are not hit by the moving arm assembly in both
directions.
4) Secure conduit to the three plastic clamps located on the side of the Pivot Arm.
5) When securing the conduit to the Pivot Arm, start at the plastic clamp labeled (1). After tightening
clamp #1, pull conduit tight, secure clamp #2, pull conduit tight, secure clamp #3.
6) Raise and lower the arm assembly to insure proper movement and adequate slack in the conduit
runaway limit
proximity sensor
(permanent location)
upper limit
control panel proximity sensor
Plastic clamps (typical)
down limit
proximity sensor
(runaway limit 3
proximity sensor stored
here during shipping)
2
1
conduit
installation
sequence
Photo Eye Tree
assembly Photo Eye
(typical)
Secure Photo Eye Tree
assembly by bolting
mounting plates to
bearing housings.
(typical)
Securing the Photo Eye Tree into place (Pro Airstream™ Dryer ONLY)
20 Belanger , Inc. * 1001 Doheny Ct. * Northville, MI 48167 * Ph (248) 349-7010 * Fax (248) 380-9681 1MANUL021