
Page 92 - FreeStyler® Maintenance Manual
P. 92
®
MAINTENANCE
Chapter 3 General Repairs
Replacing a Pivot Shaft Assembly
3) If you have plastic extrusions pressed into the sides of your arms, then the motor wire is
pushed through a cord grip, remove this plastic extrusion and slide the wire out of the cord
grip. See the image above in Step 2.
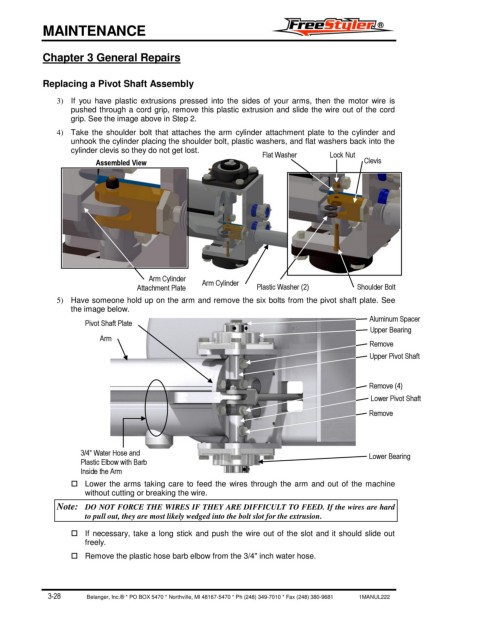
4) Take the shoulder bolt that attaches the arm cylinder attachment plate to the cylinder and
unhook the cylinder placing the shoulder bolt, plastic washers, and flat washers back into the
cylinder clevis so they do not get lost. Flat Washer Lock Nut
Assembled View Clevis
Arm Cylinder
Attachment Plate Arm Cylinder Plastic Washer (2) Shoulder Bolt
5) Have someone hold up on the arm and remove the six bolts from the pivot shaft plate. See
the image below.
Aluminum Spacer
Pivot Shaft Plate
Upper Bearing
Arm
Remove
Upper Pivot Shaft
Remove (4)
Lower Pivot Shaft
Remove
3/4" Water Hose and Lower Bearing
Plastic Elbow with Barb
Inside the Arm
Lower the arms taking care to feed the wires through the arm and out of the machine
without cutting or breaking the wire.
Note: DO NOT FORCE THE WIRES IF THEY ARE DIFFICULT TO FEED. If the wires are hard
to pull out, they are most likely wedged into the bolt slot for the extrusion.
If necessary, take a long stick and push the wire out of the slot and it should slide out
freely.
Remove the plastic hose barb elbow from the 3/4" inch water hose.
3-28 Belanger, Inc.® * PO BOX 5470 * Northville, MI 48167-5470 * Ph (248) 349-7010 * Fax (248) 380-9681 1MANUL222